2. Receivables Setup Options
The Receivables Setup Options window (Microsoft Dynamics GP | Tools | Setup | Sales | Receivables | Options) allows you to:
Set up descriptions and codes for each receivables transaction type
Set up the numbering scheme and the next number for each receivables transaction type
View the dates when sales routines, such as aging, were last run
Set the default tax schedules for receivables transactions
Change labels for the customer user-defined fields
Choose what amount types are included in sales history kept for receivables transactions
It is recommended to leave the Descriptions and Codes for receivables transactions with the default values, to facilitate support and training. The default Next Number
values for all the transactions are quite long, many companies choose
to take out a few zeros to make these numbers easier to work with. Keep
in mind that these numbers will not auto-increment the number of digits
they use, so after reaching SALES9999, the system will not be able to go to SALES10000 automatically and will instead go to SALES0000. Consider the expected volume of each type of transaction before deciding how many digits to leave.
The Date of Last
section is strictly informational, no changes to the system will occur
if these dates are changed. These dates are updated when processes such
as aging customer accounts and accessing finance charges are performed
in Dynamics GP. To ensure accurate information is available, it is
recommended not to change these dates manually.
The Default Tax Schedule IDs
set on this window will default on all receivables transactions. Even
though taxes can be changed as needed on every individual transaction,
if you plan on using the Receivables module to routinely enter customer
transactions that require tax calculations, filling out this section can
save some time and effort during transaction entry. Other modules, such
as Sales Order Processing, will have separate tax setup options.
One way of making tax calculations easier is to
create two catchall tax schedules—one containing all sales tax details
and another containing sales tax details for all jurisdictions that tax
freight. To decide what tax details to use on a transaction, Dynamics GP
first looks at the shipping method type to determine whether to use the
customer Tax Schedule ID or the company Tax Schedule ID. It then uses
the tax details that are in both the tax schedule set up for the
transaction and the customer/company tax schedule. As an example,
suppose you have the following tax schedules in Dynamics GP:
|
Tax Schedule ID
|
Tax Details included
|
|---|
|
ALL
|
NJ, NY STATE, NYC
|
|
FREIGHT
|
NJ, NYC
|
|
NJ SALES
|
NJ
|
|
NYC SALES
|
NY STATE, NYC
|
The following table shows how taxes will be
calculated using different setup options when the shipping method is
Delivery (meaning the customer's tax schedule is used):
|
Customer Tax Schedule ID
|
Transaction Tax Schedule ID
|
Tax Details included on transactions
|
|---|
|
NJ SALES
|
ALL
|
NJ—only NJ is in both NJ SALES and ALL.
|
|
NYC SALES
|
ALL
|
NY STATE, NYC—only these two are in both NYC SALES and ALL.
|
| |
ALL
|
No matter what is set up for the transaction, no taxes will be calculated if the customer is not set up to be taxed.
|
|
NJ SALES
|
NYC SALES
|
No taxes will be calculated as there is no Tax Detail that is in both NJ SALES and NYC SALES.
|
|
NYC SALES
|
FREIGHT
|
NYC—as only NYC is in both NYC SALES and FREIGHT, only NYC tax will be calculated.
|
Miscellaneous charge taxes are
separated out to allow the Miscellaneous field to be used on
transactions for non-taxable items if sales are taxed. This option is
rarely used, but is there if needed.
In the User-Defined 1 and User-Defined 2
fields, you can enter labels that will change what these fields are
called on customer setup and inquiry windows, as well as reports. The
user-defined fields are used to store additional information about a
customer. User-Defined 1 can also be used as a filter for Receivables Trial Balance reports, whereas User-Defined 2 cannot.
The Sales History Includes
section allows you to choose what types of amounts become part of the
sales total that gets stored as part of the sales summary for each
customer. The sales summary for customers can be seen on various
windows, such as the Customer Yearly Summary Inquiry (Inquiry | Sales | Yearly Summary). As an example, consider the following selections on the Sales History Includes section:

A transaction with a Sales amount of $95, Discount of
$5, Freight of $10, and Tax of $7 will add $90 (Sales less Discount) to
the customer's sales total. The default setting on this window has only
Sales selected, but many companies like to include either all or at least the Discount and Miscellaneous amounts as well.
It is important to note that the settings in the Sales History Includes
section are not what determine whether transaction history is stored
for AR transactions; these settings only determine which parts of each
transaction get accumulated in the total sales amount stored in summary history tables.
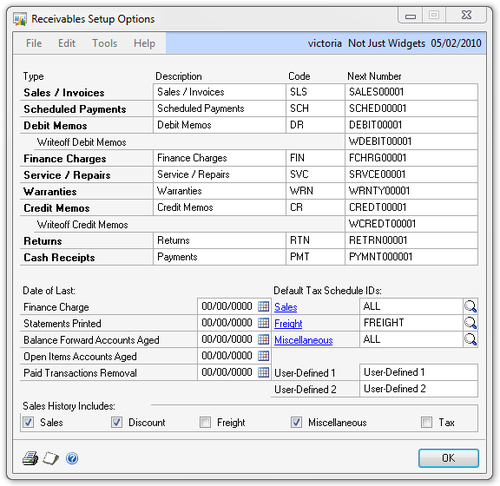
The following screenshot is an example of a typical Receivables Setup Options window:
3. Sales Territories
Sales Territories in Dynamics GP are
used for the grouping and reporting of sales transactions. They are not
required, but can add another level of available reporting filters and
summaries if used. If you are not going to be using sales territories,
you will need to set up one default territory to be used on various
Dynamics GP setup and transaction windows.
To set up a sales territory, navigate to Cards | Sales | Sales Territories. On the Sales Territory Maintenance window, the only required field is the Territory ID, the rest are informational only. The Territory ID can be up to 15 characters and it is recommended to keep these alphanumeric like other IDs. All the Maintain History
checkboxes are marked by default when a new territory is created; it is
best to leave these marked in case this history is ever needed.
4. Salespeople
Similar to sales territories, salespeople in Dynamics
GP are used for the reporting and grouping of sales. When using the
Receivables module to enter sales transactions, only one salesperson can
be assigned per transaction. In the Sales Order Processing module, each
line item on transaction can have a different salesperson. Even if the
commissions functionality is not being used in Dynamics GP, it may be
helpful to set up all the salespeople in the company so that they can be
assigned to transactions for reporting purposes.
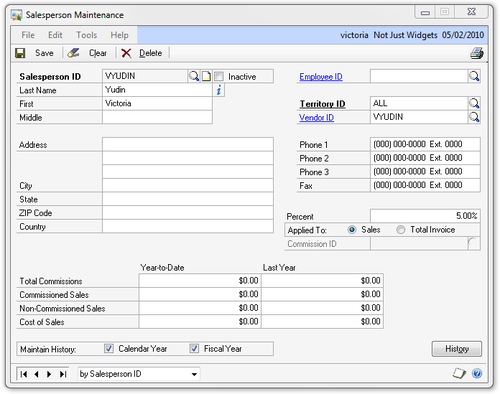
To set up salespeople, navigate to Cards | Sales | Salesperson. On the Salesperson Maintenance window, the only required fields are Salesperson ID and Territory ID—this
is the reason why you will need at least one sales territory, even if
they are not used. If the salesperson is also a vendor or an employee
set up in Dynamics GP, you can link the Salesperson ID to the Vendor ID and/or Employee ID.
Currently there is no functionality in Dynamics GP that will use these
links for any transactions, it is simply for information and reporting.
Similarly, there is a Commission ID field that is grayed out and the documentation states that it is for functionality not yet available.
The Percent field
will determine whether Dynamics GP calculates commissions on sales
transactions that are assigned to the Salesperson ID. If a value is
entered for Percent, General Ledger
distributions will be created for Commissions Expense and Commissions
Payable accounts on every sales transaction for the salesperson. The Applied To setting determines whether the commissions amount is calculated on the Sales amount (subtotal, not including any trade discounts, miscellaneous charges, freight, or tax) or the Total Invoice amount.
When you create a new salesperson, the Maintain History
checkboxes will be marked and it is recommended to leave these in case
history is needed. The following is an example of a typical Salesperson Maintenance window: